
How Electric Car Batteries Are Made

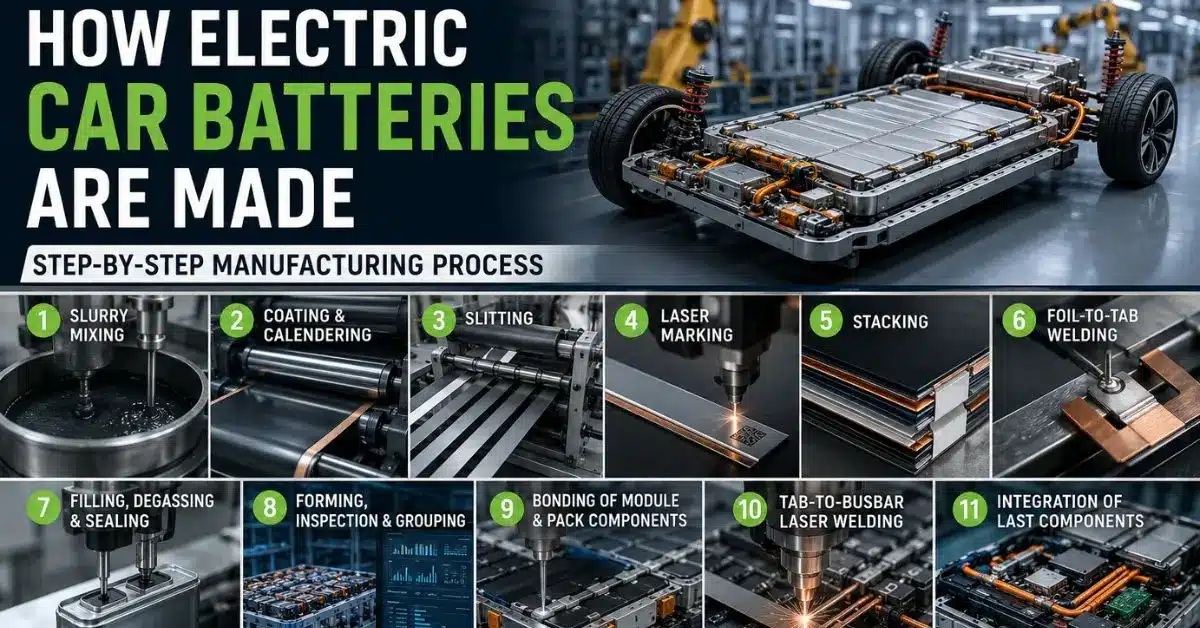
Electric vehicles are changing the way we drive. But have you ever wondered what powers them? The answer is the EV battery — and making one is a truly fascinating process.
The Basics: The Cell Structure
The most important part of any EV battery is the cell. Think of cells like tiny energy storage boxes. Hundreds or even thousands of them are packed together to power your car. The most popular type used today is the lithium-ion battery because it stores a lot of energy without costing too much. Different lithium-ion chemistries use different cathode materials, including LFP vs NMC battery materials.
There are three main shapes of battery cells — see cylindrical vs prismatic vs pouch cells for a full comparison:
- Cylindrical cells — shaped like an AA battery, these are the most common
- Prismatic cells — flat and box-like, used in many popular EVs
- Pouch cells — thin and flexible, like a sealed bag
No matter what shape they are, every cell contains the same key parts:
- Electrode sheets — these are thin metal foils coated with special materials. There are two types:
- Anodes (made of copper) — carry the negative current
- Cathodes (made of aluminum) — carry the positive current
- Separator sheets — made from a porous material called polyolefin, these sit between the anode and cathode to stop short circuits
- Liquid electrolyte — a special liquid soaked up by the separator that lets electric current flow through
- Cell casings — the outer shell, usually made of nickel-plated steel or aluminum to prevent reactions with the electrolyte
These current collectors (the metal foils) work together with graphite on the anode side and lithium-metal oxide on the cathode side to store and release energy.
How Electric Car Batteries Are Made From Start to Finish
Step 1: Mixing of the Slurry Preparation
The first step is making a thick paste called the slurry. This paste is what gets applied to the electrode sheets to help produce and conduct electricity.
Making the slurry is a careful process. Everything is mixed under a vacuum to ensure no air bubbles or moisture are trapped inside. Any air or water left in the mix could damage the battery later.
The slurry contains three key ingredients:
- Binding agents — these hold all the ingredients together
- Active materials — these are what actually produce electrical energy (like graphite for the anode and lithium-metal oxide for the cathode)
- Conductive materials — these help electricity flow more easily
Before anything is mixed, the raw material validation step checks that every ingredient meets the required quality standards.
Step 2: Coating & Calendering
Once the slurry is ready, it gets applied to the electrode sheets using a special machine called a coater. Here’s how the process works:
- Pouring — the slurry is poured onto the metal foil sheets
- Scraping — a blade removes any extra paste so the coating is perfectly even
- Drying — the sheet passes through a dryer to remove all the liquid
- Calendering — a rolling press squeezes the sheet to get the exact right thickness and porosity (tiny holes that help the electrolyte move through)
Getting the porosity and thickness right is super important. Too thick or too dense, and the battery won’t perform well.
Step 3: Slitting of the Sheets
Now the big coated sheets need to be cut down to size. This is called slitting.
Each cell type needs a different shape:
- Cylindrical cells need long, narrow strips that get rolled into a jelly roll
- Prismatic cells need flat rectangular shapes to fit inside their box-like casing
- Pouch cells also need a rectangular shape that lines up neatly with the edges of the pouch
For large-scale production, laser cutting is the go-to method because it’s fast and precise. For smaller labs or research settings, die cutters are used instead.
Step 4: Identification for Traceability
Here’s a step most people don’t know about — every single anode and cathode sheet gets its own permanent ID code.
Laser marking is used to stamp a tiny 2D code onto each sheet. These codes are like barcodes for battery parts. They help manufacturers:
- Group cells that have similar electrical properties and mechanical properties together for better performance
- Track cells as they move through the supply chain
- Identify problems quickly if a manufacturing issue is found later
This step is all about quality control and knowing exactly where every part came from.
Step 5: Stacking
Now comes one of the most critical steps — building the stack.
A stack is a carefully layered sandwich of sheets in this order: anode → separator → cathode → separator, and so on, repeated many times. This stack is later placed inside the cell casing.
There are four main ways to build a stack:
- Single Sheet Stacking — sheets are placed one by one, very precisely
- Winding — sheets are wound around a rotating stack holder (for cylindrical cells, the holder is tube-shaped)
- Z-Folding with Single Electrode — anodes and cathodes are placed alternately on a separator sheet roll in a zigzag pattern
- Z-Folding — multiple sheet rolls are folded together in a left-right motion
Each method has its own advantages, depending on the cell type and required production speed.
Step 6: Foil-to-Tab Welding
Once the stack is built, tiny metal strips called tabs are welded onto it.
- One metal strip is welded to the stack of copper foils (the anode side)
- Another is welded to the stack of aluminum foils (the cathode side)
These tabs act as connection points. They link the inside of the cell to the outside cell terminals, which will later connect to a busbar to complete the electrical circuit.
Two methods are used for this welding:
- Ultrasonic bonding — uses high-frequency vibrations to fuse metals
- Laser welding — uses a focused laser beam for a clean, strong weld
Step 7: Filling, Degassing & Sealing
Now it’s time to bring the cell to life by adding the liquid electrolyte.
The electrolyte is carefully poured into the casing and soaks into the separator sheets. The type of electrolyte matters a lot. Manufacturers often add special additives to adjust things like viscosity (thickness of the liquid) and improve conductivity.
After filling, the cell goes into a vacuum chamber for degassing — this removes any trapped air bubbles to make sure the electrolyte is spread evenly throughout.
Finally, the casing is sealed completely shut using one of these methods:
- Crimping — folding the metal edges tightly together
- Laser welding — melting the casing shut with a laser
- Ultrasonic bonding — vibration-based sealing
- Heat sealing — using heat to fuse the pouch shut (for pouch cells)
This hermetic sealing keeps the electrolyte in and everything else out — forever.
Step 8: Forming, Inspection & Grouping
This step is where the battery cell is “woken up” for the first time.
Forming involves connecting the fresh cells to charging equipment and running them through multiple charge and discharge cycles with resting periods in between. This process sets the cell’s electrochemical properties — basically teaching the battery how to behave.
After forming, every cell goes through a thorough inspection:
- Electrical properties are tested — including capacity, voltage, and internal resistance
- Mechanical properties are checked using vision cameras to spot any physical defects
- Cells that don’t meet the required standards are rejected
The surviving cells are then sorted into groups based on their matching properties. This cell grouping ensures that cells with similar electrical and mechanical properties are assembled, which leads to better, more consistent battery performance.
Step 9: Bonding of Module & Pack Components
Now the individual cells get assembled into modules, and modules get assembled into a full battery pack — or, in newer designs, directly into the pack. See what is a Cell-to-Pack battery design for how this module-free approach changes the process.
During this process, special adhesives and sealants are applied using a dispenser machine. These aren’t just glue — they also provide important properties like:
- Thermal conductivity — to move heat away from the cells
- Electrical conductivity — in some areas where a conductive bond is needed
- Insulation — to protect certain components from electrical current
Adhesives are applied to battery housings, cell casings, and parts like cooling tubes.
To make the bonds as strong as possible, laser surface preparation is done before the adhesive goes on. This process cleans off all contaminants and can even adjust the surface roughness for a better grip. UV light curing is used to harden the adhesive quickly, so production doesn’t slow down.
Step 10: Tab-to-Busbar Laser Welding
Remember those tabs we welded earlier? Now they get connected to the busbar.
A busbar is a flat metal sheet that connects all the cells in a module together. By arranging cells in serial circuits and parallel circuits, manufacturers can hit the exact voltage and capacity targets needed for the vehicle.
In the past, these connections were made with ultrasonic wire bonders. But today, laser welding machines have taken over because they’re:
- Faster than wire bonding
- Gentler — they don’t stress the cells with heavy vibrations like ultrasonic methods do
This is why most automotive manufacturers now exclusively use laser welding machines for cylindrical cells.
Step 11: Integration of Last Components
The battery pack is almost done — but a few critical systems still need to be added.
Battery Management System (BMS)
The BMS is basically the brain of the battery. It’s a computer that manages everything the battery does and talks to other parts of the car, like the charger, inverter, and vehicle control unit. It has its own independent electrical circuit. Sensors placed throughout the pack monitor cell health and temperature, and a cable harness connects all those sensors back to the BMS.
Hydraulic Connections
EVs need to keep their batteries at the right temperature. A thermal management system — made up of tubes, pumps, valves, and other parts — circulates liquid coolant through the pack. All these hydraulic connections are carefully installed and linked to the BMS.
Fireproof Protection
Safety is a top priority. Endothermic coatings are applied to the cells and modules. These coatings absorb heat and act as flame retardants during a thermal runaway (when a battery overheats uncontrollably). They also help with everyday performance, safety, and longevity of the battery.
Final Validation
Before the battery ships, it goes through a full set of tests:
- All electrical connections are checked
- Voltages are verified
- The cooling system is tested for leaks
- The battery case is confirmed to be completely watertight
Only after passing all these checks is the battery pack ready to power an electric vehicle.
Summary
Making an EV battery is a long, highly precise process involving chemistry, engineering, and advanced technology like laser welding and robotic automation. Here’s the full journey in a nutshell:
Step | What Happens |
|---|---|
1 | Slurry is mixed under vacuum with binding agents, active materials, and conductive materials |
2 | Electrode sheets are coated, dried, and compressed to the right thickness |
3 | Sheets are cut to shape using laser cutting or die cutters |
4 | Laser marking adds 2D traceability codes to every sheet |
5 | Sheets are stacked in anode-separator-cathode layers |
6 | Copper and aluminum foil tabs are welded onto the stack |
7 | Liquid electrolyte is added, degassed, and the cell is sealed |
8 | Cells are charged, tested, and grouped by matching properties |
9 | Modules and packs are bonded together with thermal adhesives |
10 | Cell tabs are laser-welded to the busbar |
11 | BMS, cooling system, and fire protection are installed and validated |
From raw materials to a fully tested battery pack, every step matters. That’s what makes EVs safe, reliable, and powerful on the road.
The performance of an electric vehicle depends heavily on the materials inside an EV battery and how these components work together.
